1. Choosing the Right Location
- Light: Sage loves sunny spots. Choose a location that gets at least 6 hours of direct sunlight per day.
- Soil: Well-draining, slightly dry soil is ideal. Sage thrives in sandy or rocky soils that aren’t too moist.
- pH Level: The soil should be slightly alkaline to neutral (pH 6.5 to 7.5).
2. Preparing the Seeds
- Germination: Sage seeds are slow to germinate, taking 2-3 weeks before seedlings appear.
- Soaking (optional): To speed up germination, you can soak the seeds in lukewarm water overnight before sowing.
3. Sowing the Seeds
- Timing: The best time for sowing sage seeds is in late spring when soil temperatures are around 15-20°C (59-68°F). Indoors, you can start 6-8 weeks before the last frost.
- Seed Trays or Pots: Use seed trays or small pots filled with seed-starting soil. The soil should be loose and well-draining.
- Spacing: Place the seeds about 2-3 cm (1 inch) apart and cover them lightly with a thin layer of soil (about 0.5 cm).
- Watering: Lightly mist the soil with water. Keep the soil evenly moist but avoid overwatering.
4. Germination and Care of Seedlings
- Germination Conditions: Place the seed trays or pots in a warm, bright spot with temperatures around 20°C (68°F). Cover the trays with a clear plastic bag or lid to retain moisture, but ventilate daily to prevent mold.
- Transplanting: Once the seedlings are about 5 cm (2 inches) tall and have developed their second pair of leaves, they can be carefully transplanted into larger pots or the garden.
5. Planting Outdoors
- Timing: Transplant your seedlings outdoors once there’s no longer any risk of frost and the plants are well-established (at least 8 cm tall).
- Spacing: Plant sage with about 30-40 cm (12-16 inches) between plants as it grows into a bushy shape.
- Improving Soil: If the soil is too heavy, mix in some sand or gravel to improve drainage.
6. Caring for Sage
- Watering: Sage is drought-tolerant once established and only needs occasional watering. Water deeply, but allow the soil to dry out between waterings. Avoid overwatering as sage is sensitive to waterlogged conditions.
- Fertilizing: Sage requires little fertilizer. Once a year in the spring, a light application of compost or organic fertilizer is enough. Too much nitrogen will cause the plant to grow more leaves but with less flavor.
- Pruning: Regular pruning helps keep the plant bushy. After flowering, you can cut it back by about a third to maintain its shape and prevent it from becoming leggy.
7. Harvesting
- Timing: Sage leaves can be harvested year-round but are most flavorful before flowering in late spring or early summer. Harvest leaves in the morning when essential oils are at their peak.
- Drying and Storing: Sage leaves can be dried easily. Hang the harvested stems upside down in a cool, dry place. Once dried, store the leaves in airtight containers.
8. Overwintering
- Frost Protection: Sage is hardy but can be damaged by severe frost. In cold climates, protect the plants with a mulch layer of straw or leaves, especially for younger plants.
- Protect from Excess Moisture: In winter, it’s important to keep sage from getting too wet. A cover to shield the plant from excess rain can help.
9. Pests and Diseases
- Pests: Sage is rarely affected by pests due to its strong aroma, which repels many insects. Occasionally, you may find aphids or spider mites.
- Diseases: Root rot due to overly wet conditions is the most common problem. Ensure proper drainage and avoid overwatering.
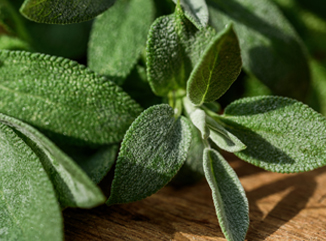
With these tips, you can successfully grow sage from seeds and care for it in your garden. Best of luck with your sage plants!

